Launch Guide
Doc Upload Templates
What are Doc Upload Templates?
Doc Upload Template is one of the foundation pieces to the LendAPI decision engine’s credit decision tree process.
From time to time, at the end of the decision tree branch, the end node dictates that additional documentation must be uploaded to the platform in order to satisfy the underwriting process.
For instance, if the decision tree is dealing with identity verification and the third party data from the vendor cannot positively identify the application, the bank might decide at that point for the customer to upload some form of identity document for their back office staff to review and determine the next step for the applicants to take.
For the decision tree to act accordingly and notify the customer of the exact document needed, we designed a Doc Upload Template for the bank to configure exactly the types of documentation needed under any specific circumstances.
In this section we will show you where to locate the Doc Upload Template library and how to add a template and use it in the decision making process.
Where to find Doc Upload Templates?
Doc Upload Template can be found on the left navigation bar in the LendAPI administrative portal. This section can be located within the Workflow section of the platform where all of the decision engine related settings can be found.
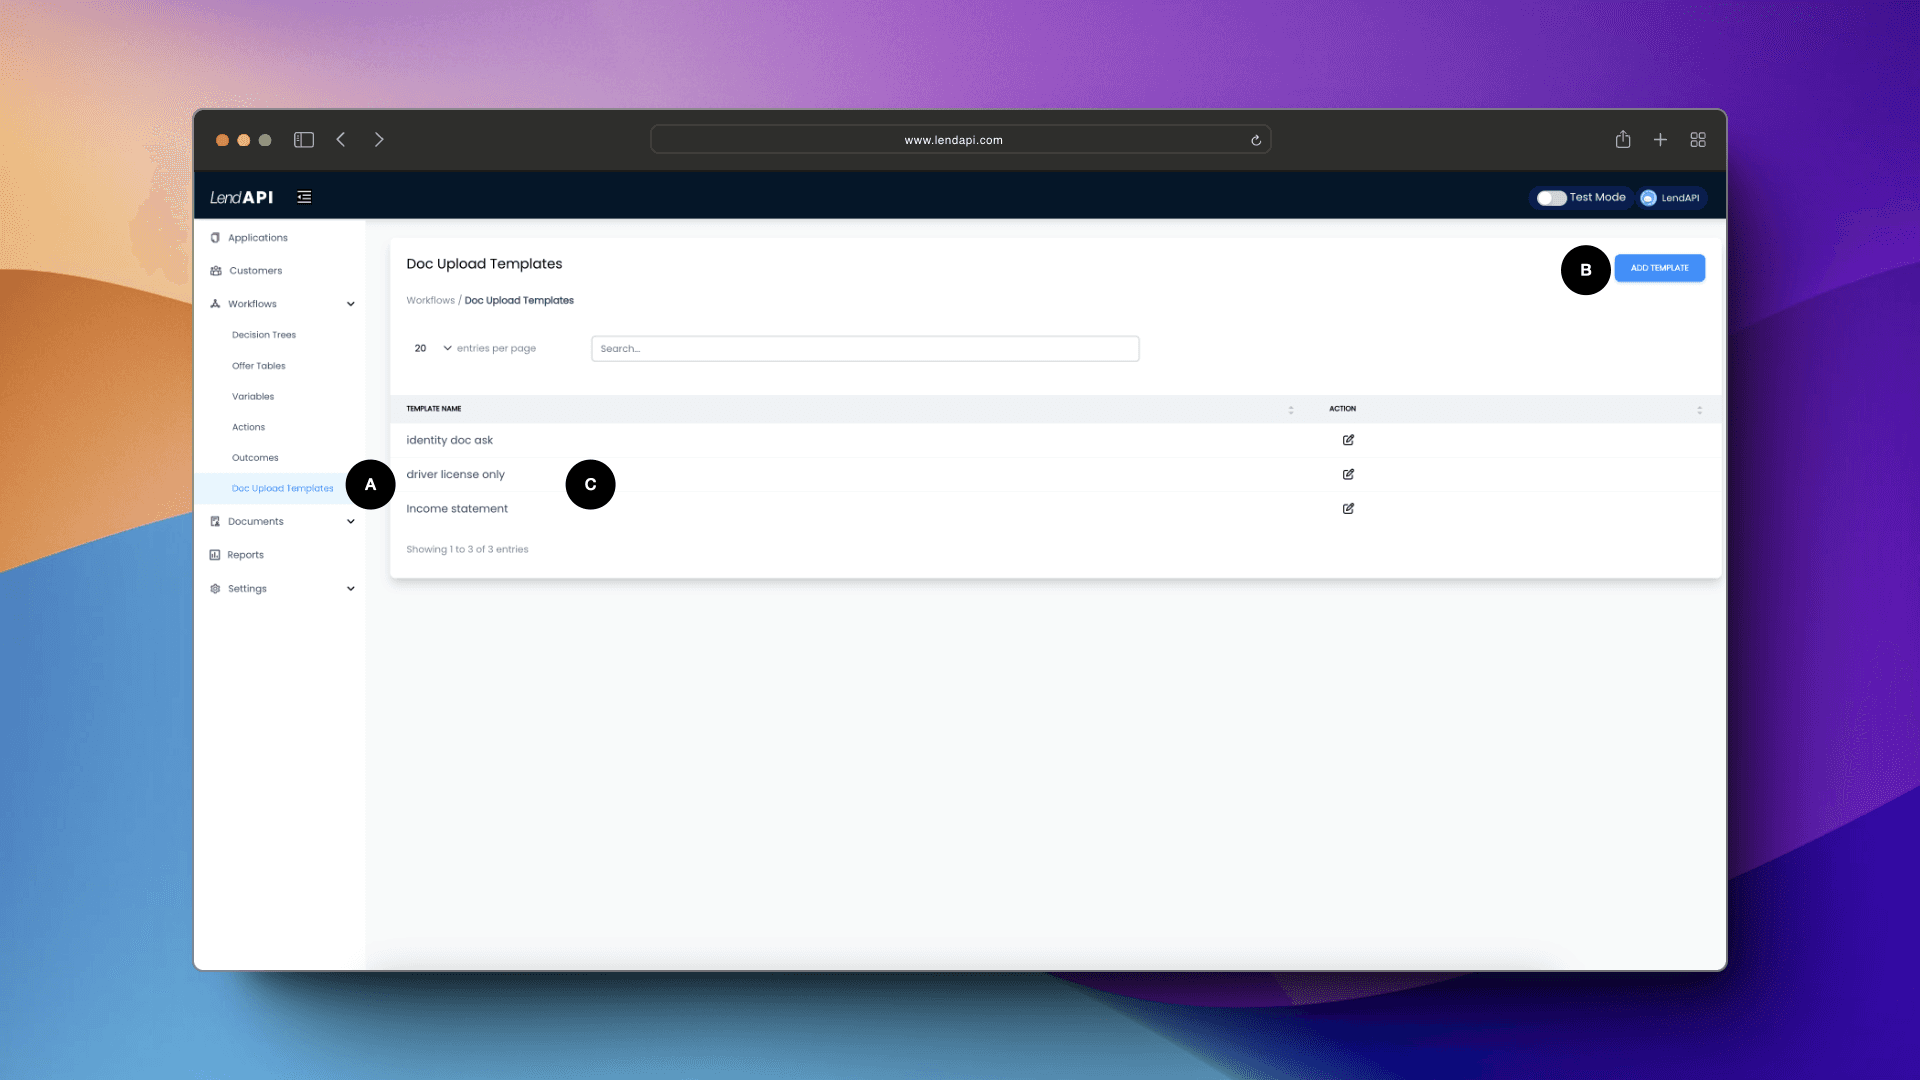
A. Goto Workflow and then click on Doc Upload Template. This is where all of the templates are stored and you can add new ones as you see fit.
B. Add Template - Add template button allows you add another doc upload template where you can link to your underwriting strategy and email templates.
C. A list of all Doc Upload templates in this library.
How to edit a Doc Upload Template?
You can edit any of the templates already created by clicking on the edit button. Here you can see the types of documents you would like to ask the applicants to upload.
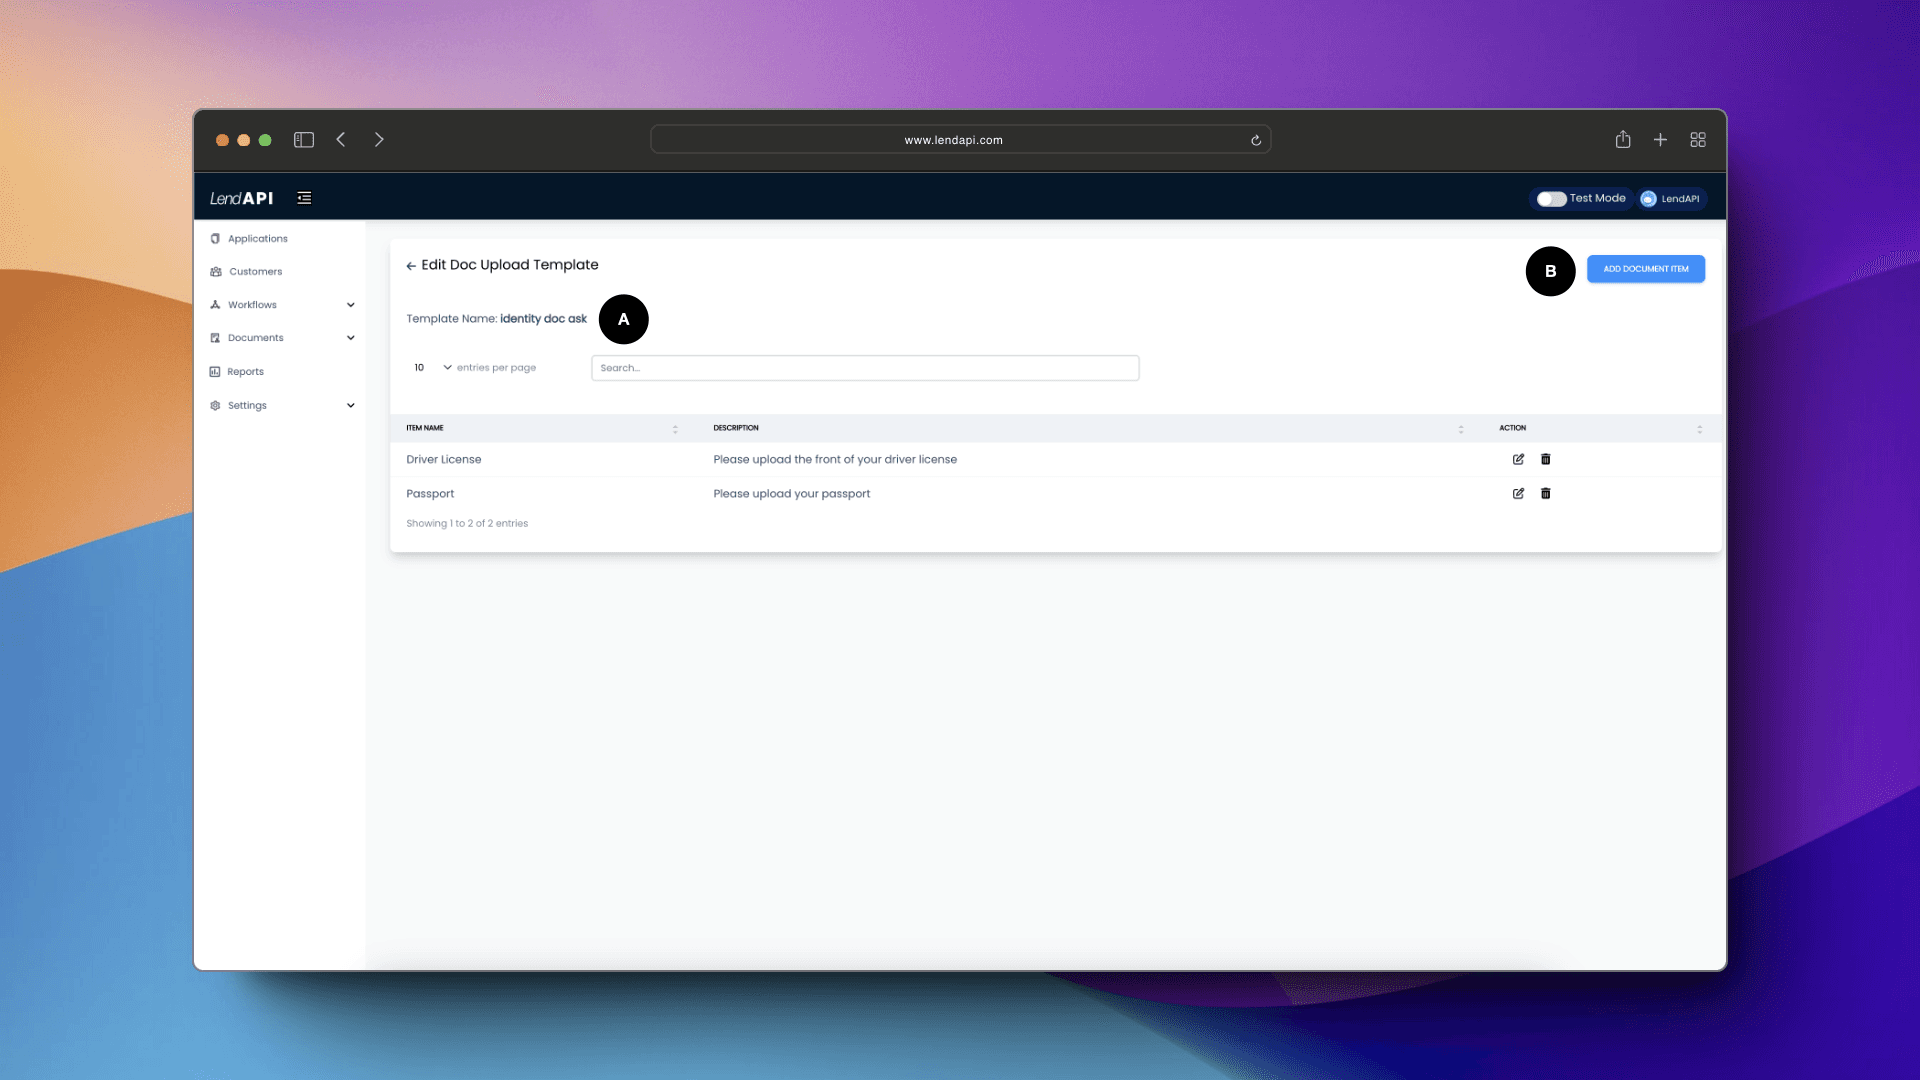
A. This is the name of the Doc Upload Template you are editing
B. Add Document Item: You can add additional Document Types within this template. You can also edit the specifics around each document type that were already added as well as deleting them.
How to edit Document Items within the Doc Upload Templates?
Each Doc Upload Templates should have one or many Document Items. These items are what you would ask the applicants to upload and each item should have a name and a description.
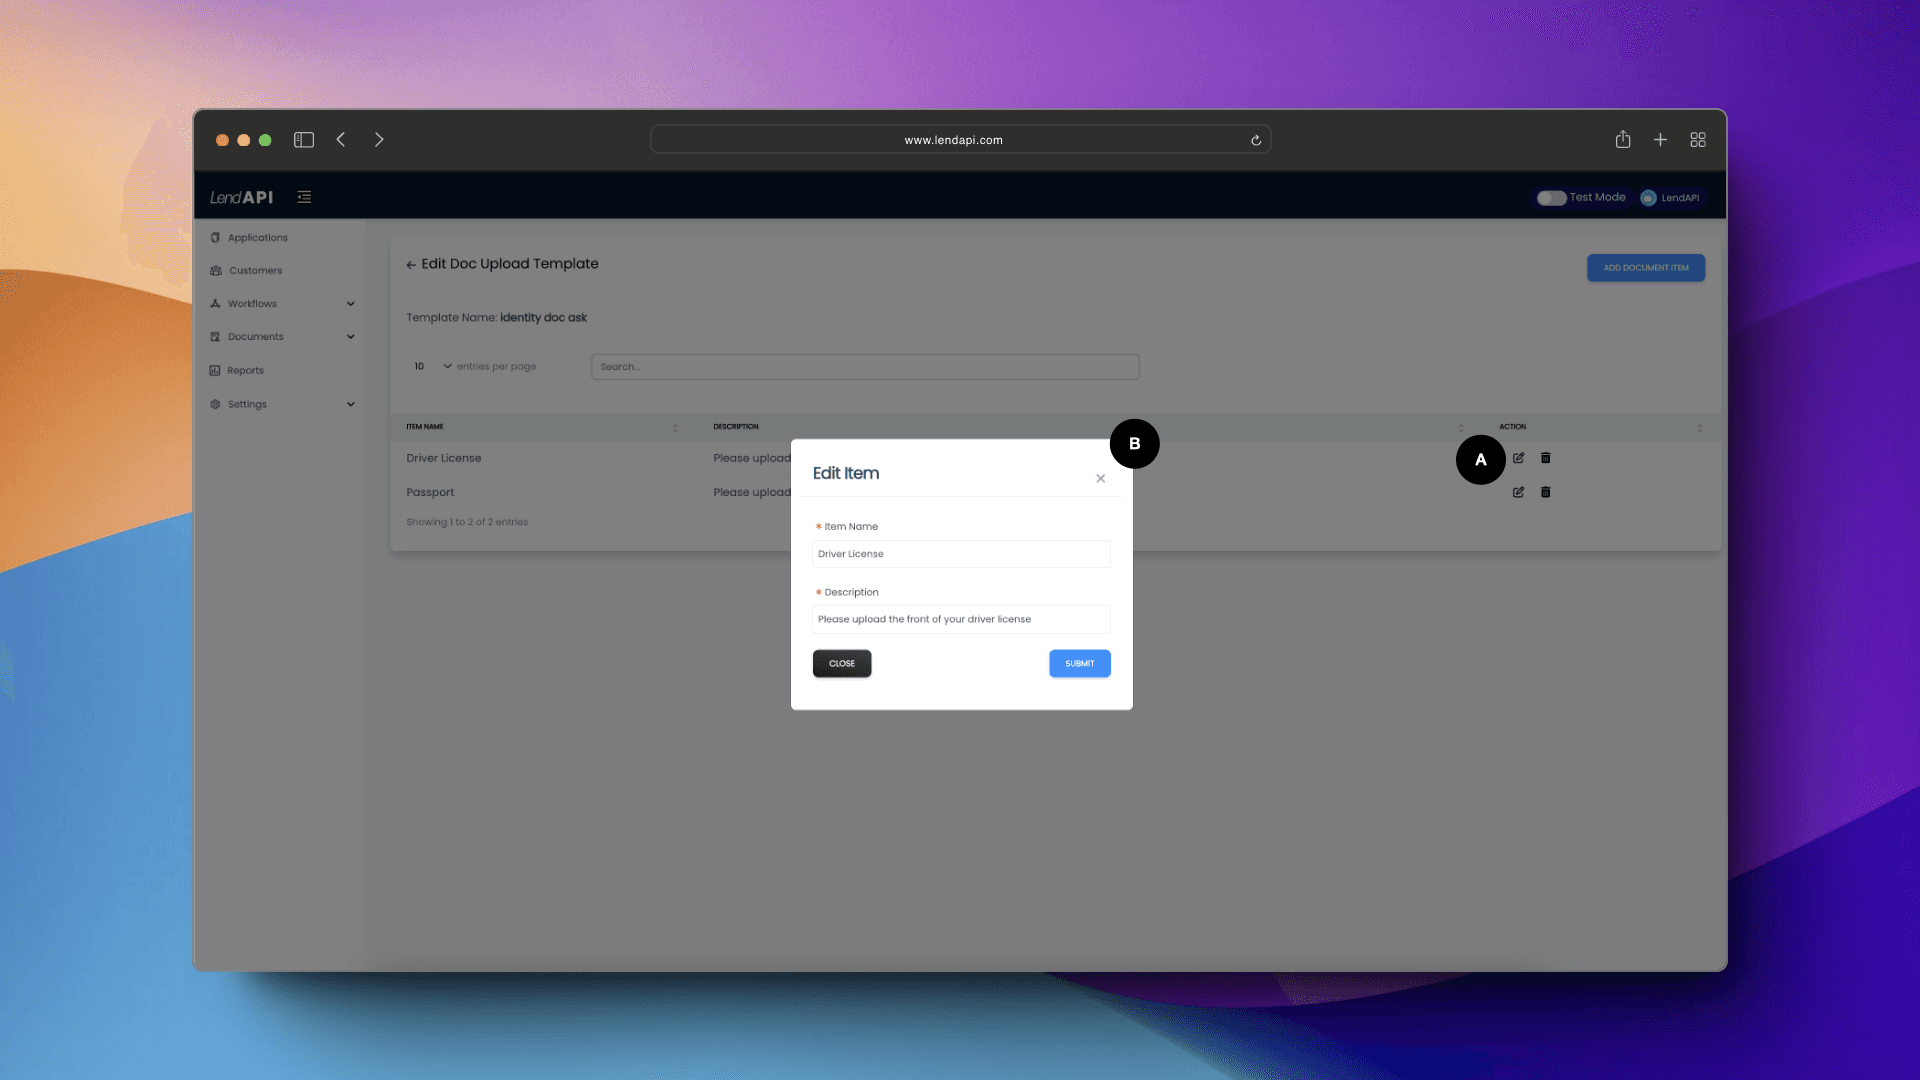
A. Click on the edit button of any document item that’s already there will bring up a prompt to edit the name of the document as well as the description of the document
B. You can edit the name and description of the document. The name and the description will show up on the email template which the applicant will receive with a link to upload these documents in their customer portal.
How to add a new template within the Doc Upload Templates?
Here, we are going back to the Doc Upload Template library and show you how to add a new Doc Upload Template, e.g. a folder for all of the document items.
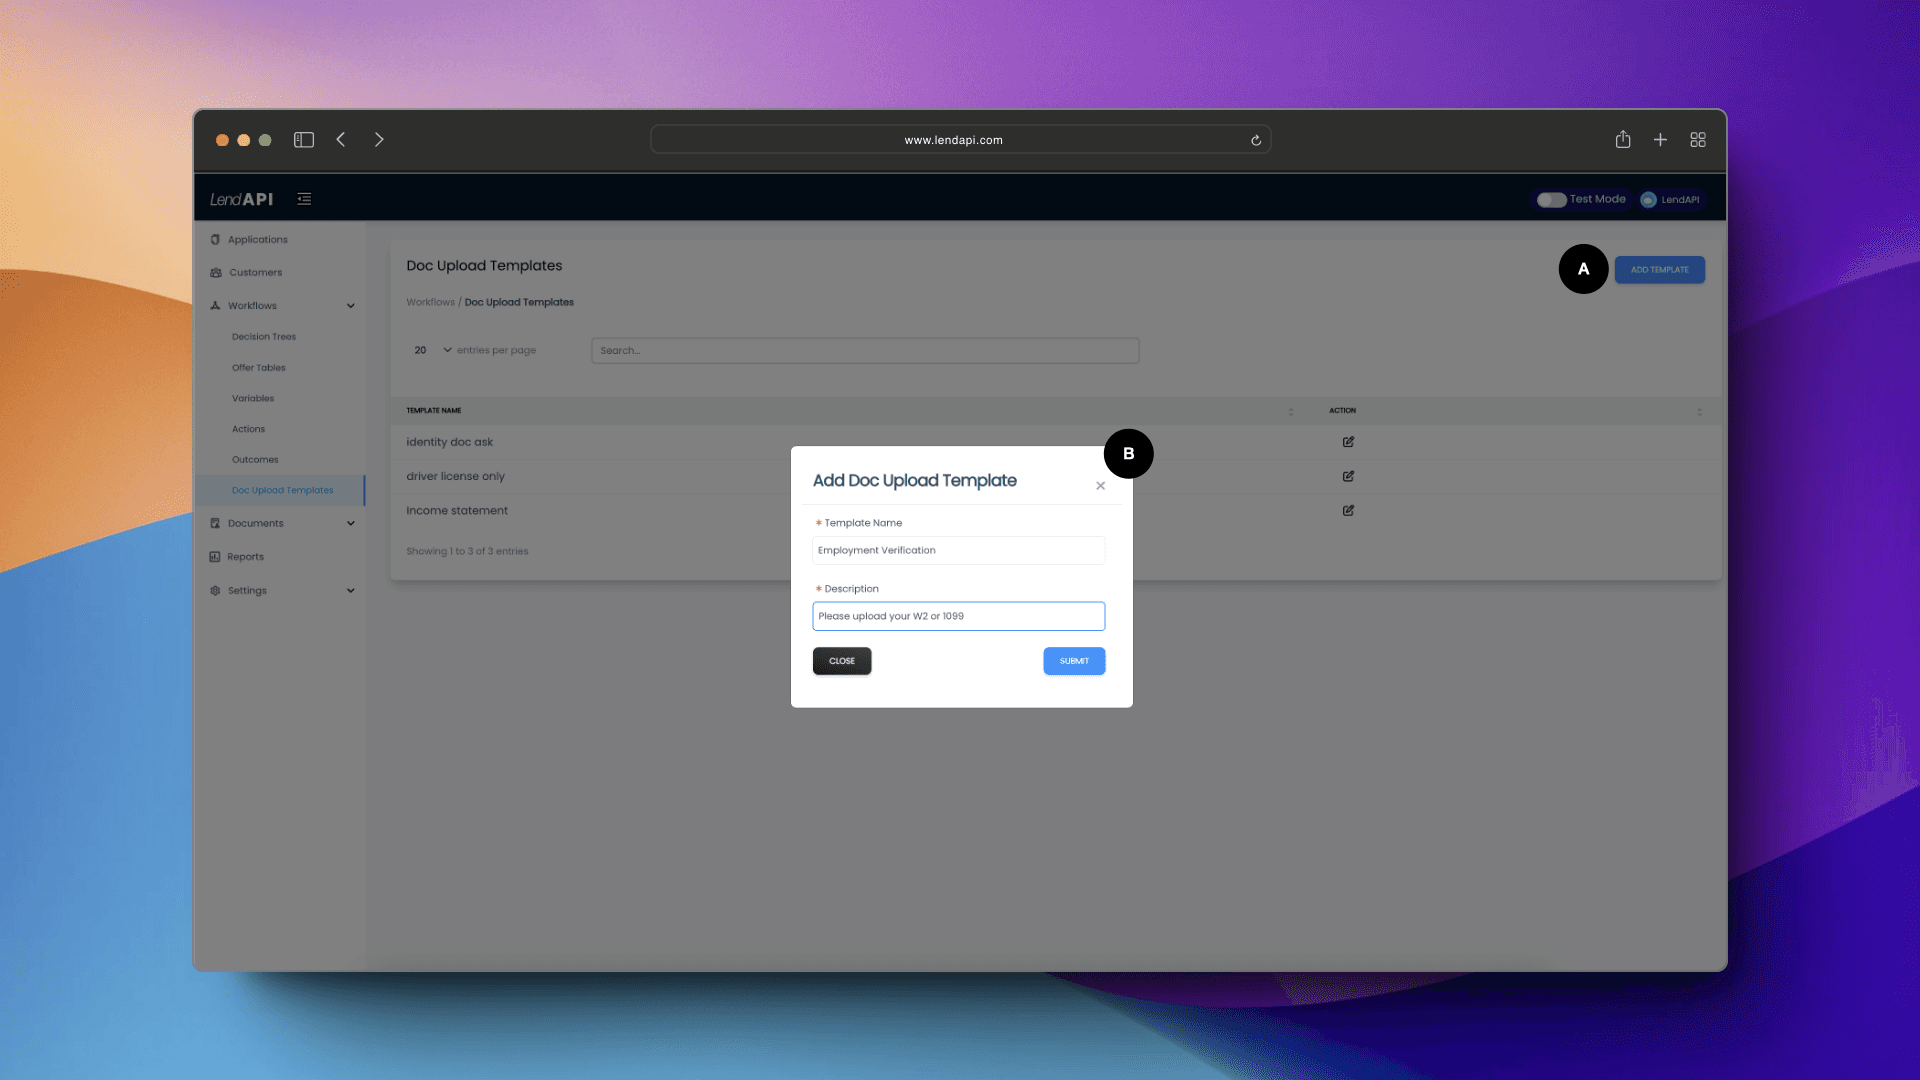
A. Add Template - This button will bring up a prompt for you to add a new doc upload template.
B. A new doc upload template needs a name and a description. This information will appear in the email template you will be sending to your applicants to let them know what type of document items need to be uploaded. In this case we are adding a template called “Employment Verification”. Next we will add a few document items.
How to add a new Document Item within a Doc Upload Templates?
Once a new template is created, you can add document items. You can have as many items as you like. Keep in mind that these items will be recorded for this particular applicant and they must upload these items to the decision engine’s satisfaction. These document items will also be reviewed by an agent later and determine the next steps.
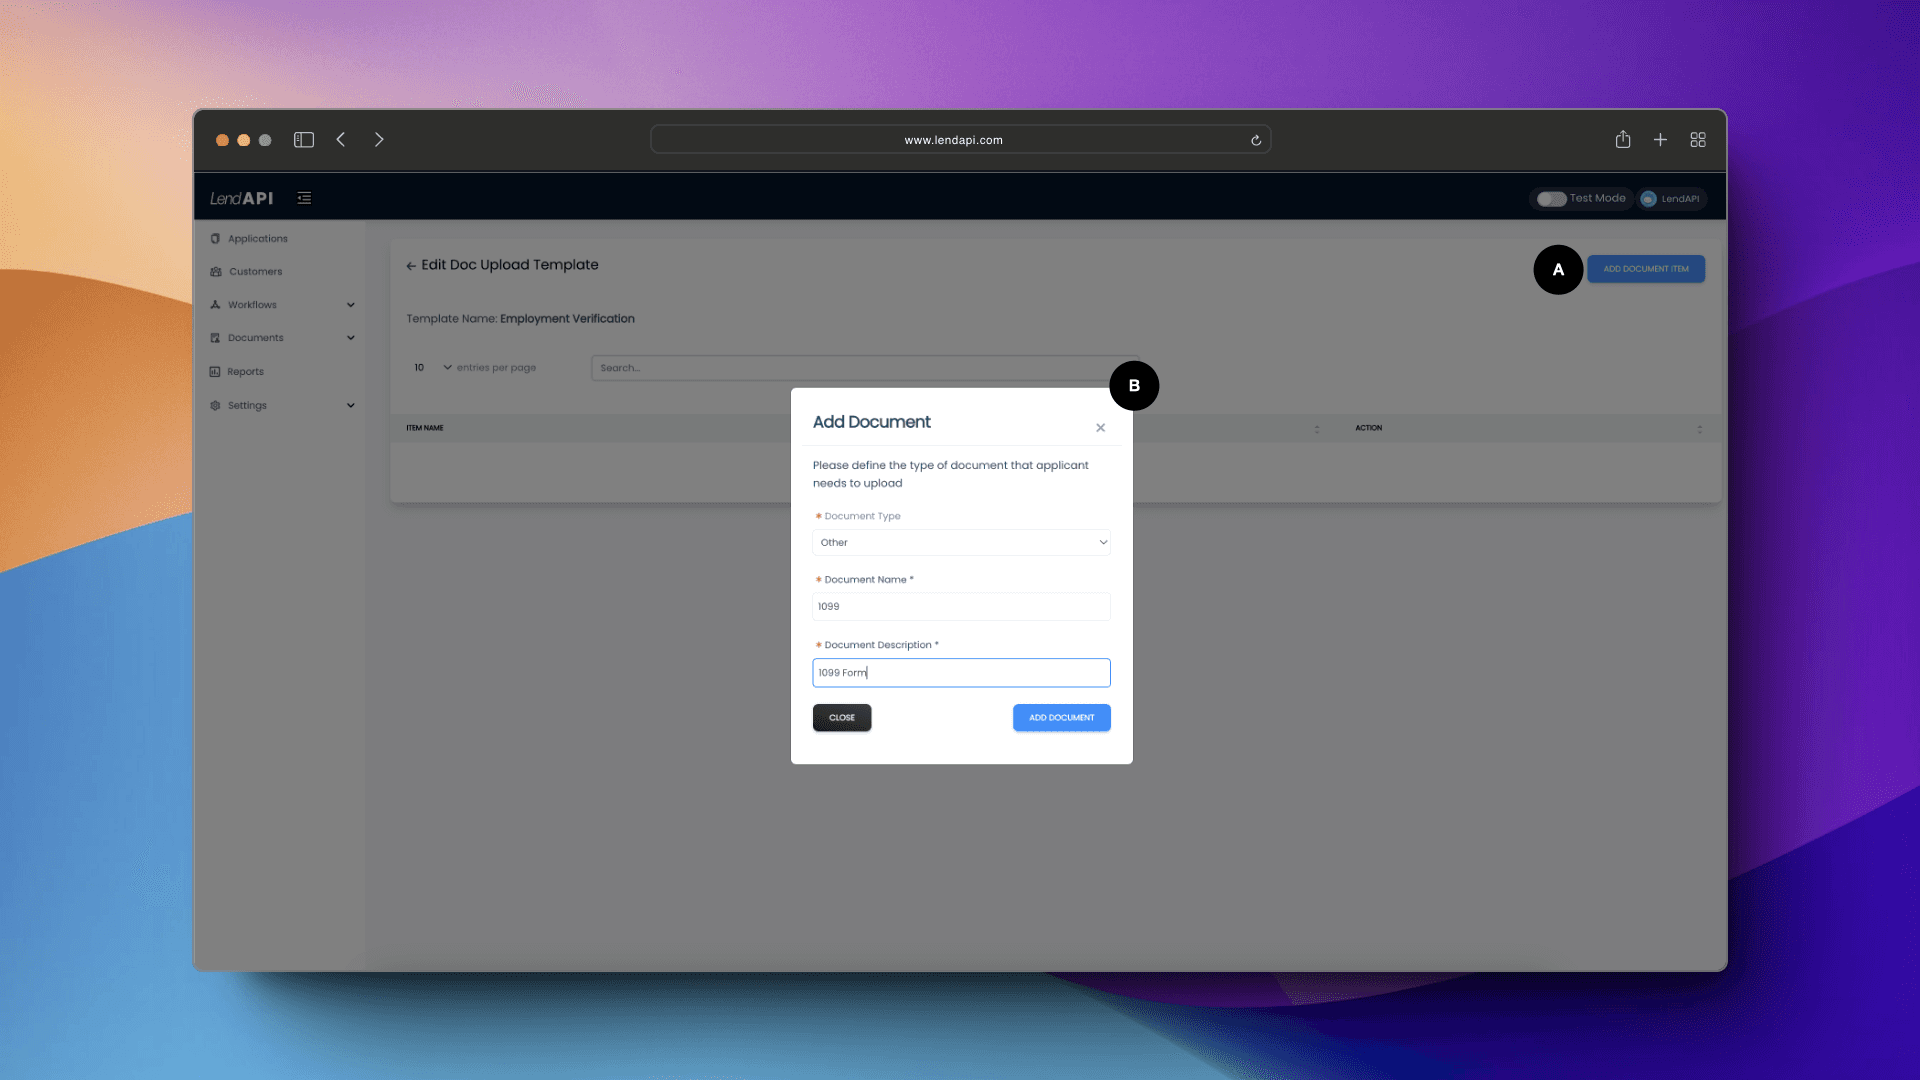
A. Add Document Item - This button will bring up a prompt for you to start adding document items as part of this template.
B. Now you can give the document item a name and a description. In this example, we would like the applicant to upload Employment Verification documents and it’s only fitting that we ask for a 1099 document. You can also ask for W2 and Job Offer documents etc.
How do I use a Doc Upload Template?
Now that you’ve created a new template and added a few document items in the template. How do I link this template to my decision engine and my decision trees? In this section and the following sections, we will show you how to link this template and its document requests to a Decision Outcome and therefore to an End Node of a decision tree.
We will start with the Decision Outcome section of the platform. For more information on Decision Outcome, please visit the earlier section detailing how Decision Outcomes work.
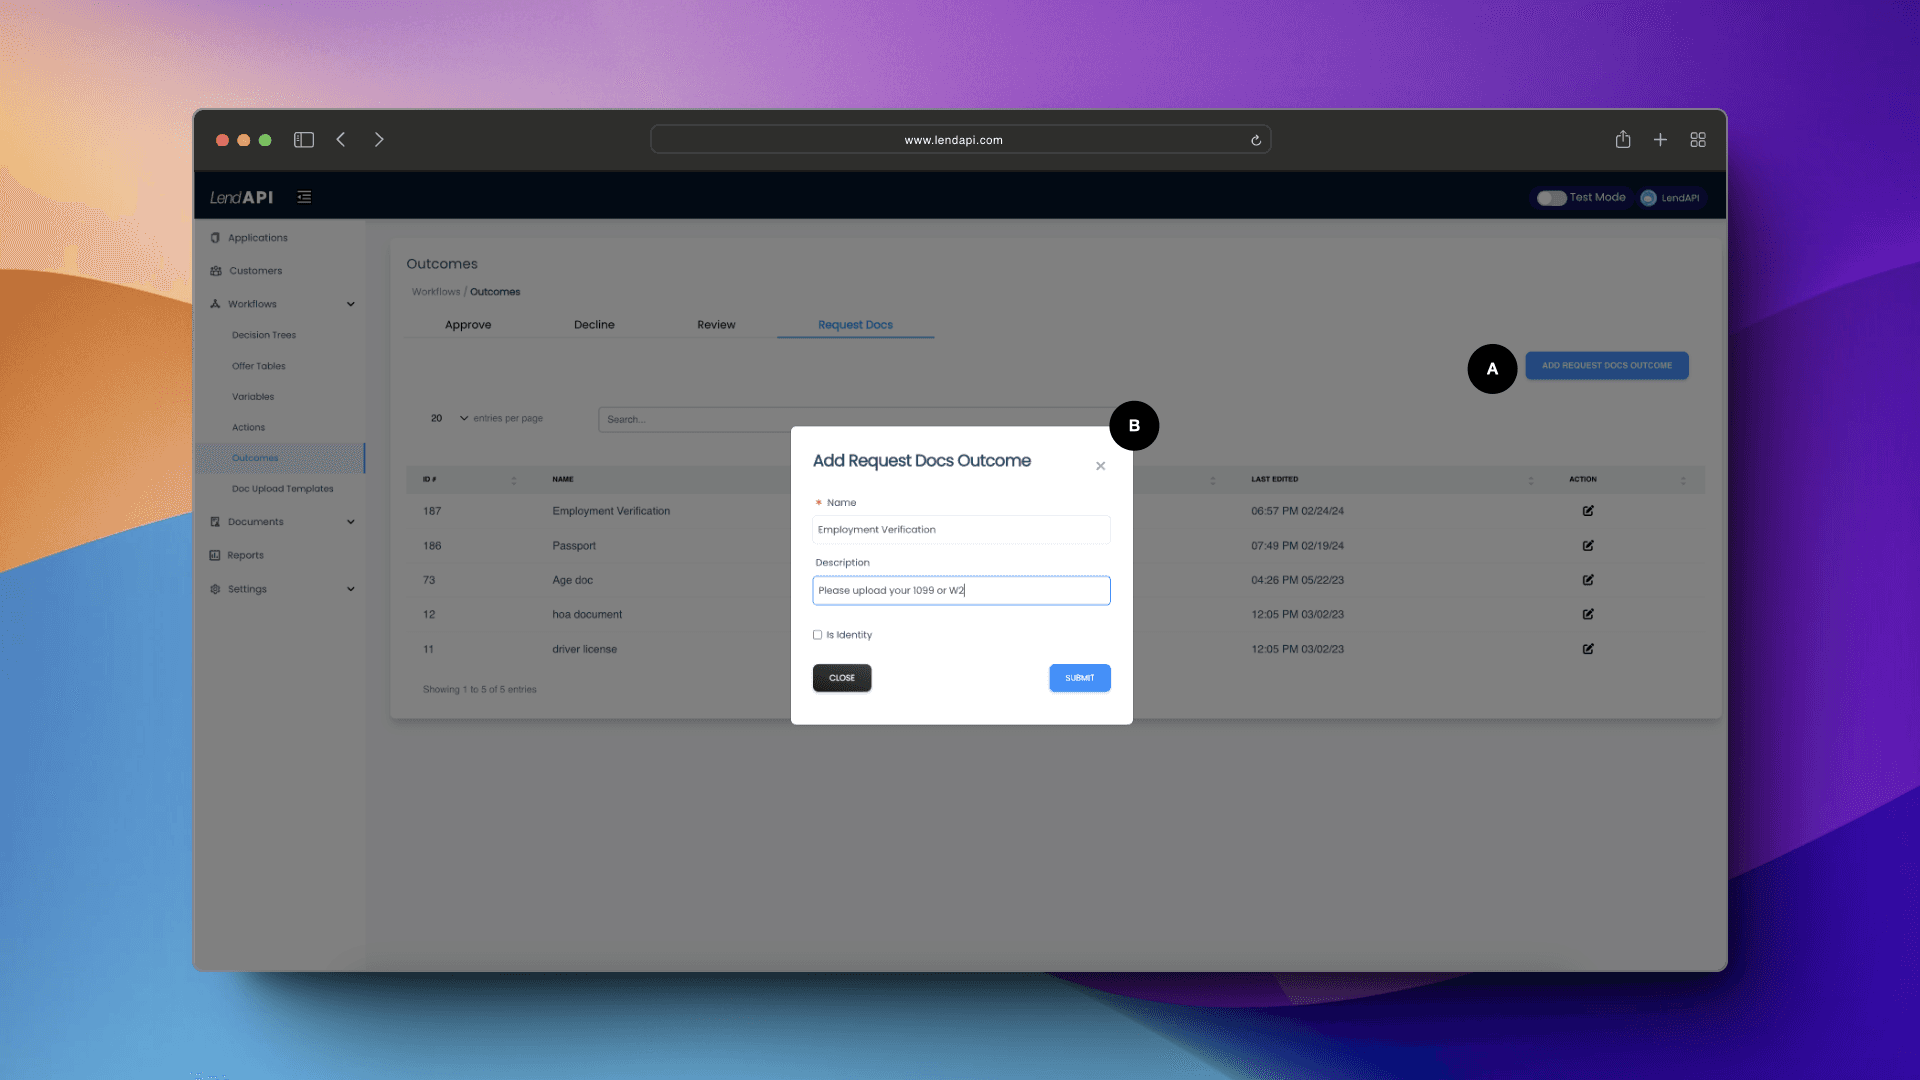
A. We go back to the Decision Outcomes module of the Workflow section. We then goto the Request Docs tab which is also a Decision Action. We then click on “Add Request Doc Outcome” and a prompt will display.
B. We give this new Decision Outcome a name. Since we are focusing on employment verification, we will call this Decision Outcome as "Employment Verification" and we can also write down a description of this outcome.
Linking the new Doc Request Decision Outcome to an email template.
Click on the Doc Request Decision Outcome and hit the edit button. You can now link an email template to this outcome. We went ahead and created an email template (we will show you how to do that next) and linked it with this new Doc Request Decision Outcome that we just created.
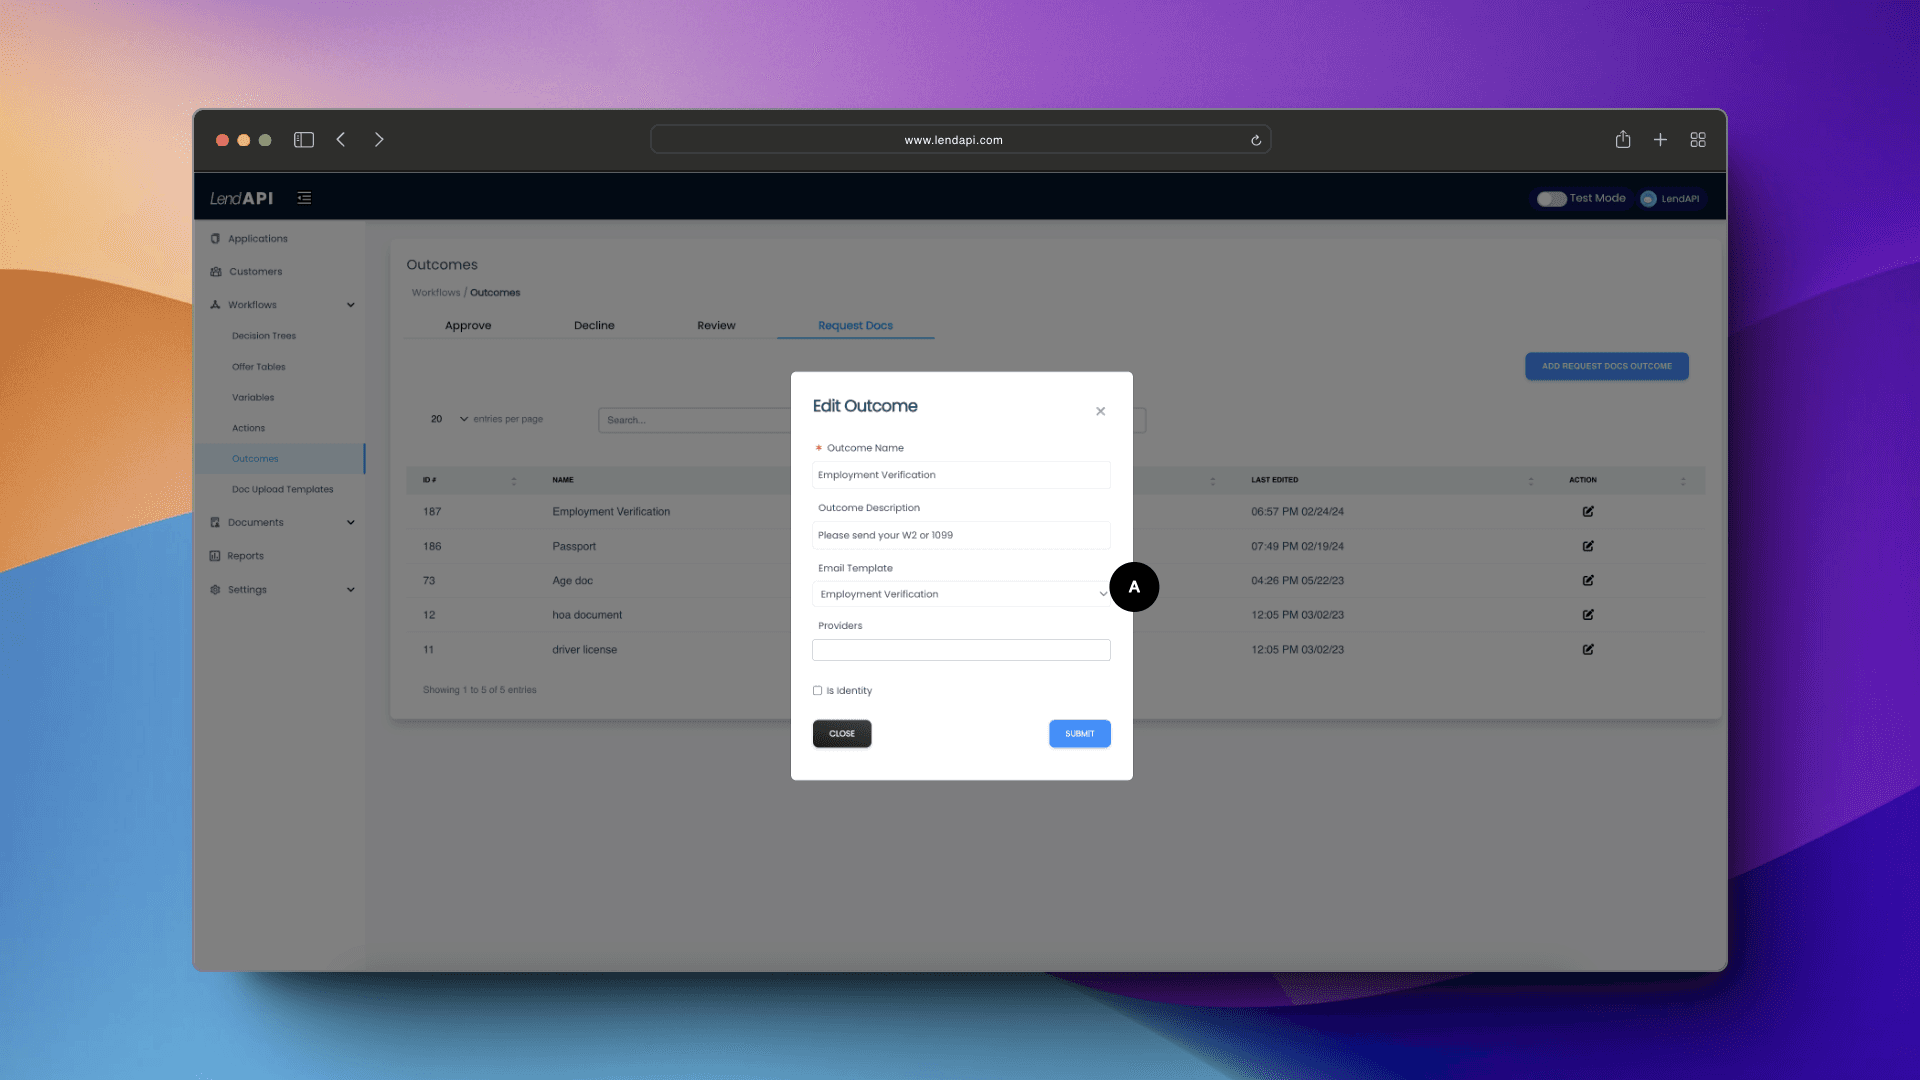
A. You can select an email template to link to this new Employment Decision Outcome. We will show you how to create this email with the correct doc template next.
Creating email template to link to the Doc Request Decision Outcome
We will now direct your attention to the Email Template section of our tool. We will show you that we need to create a new email template to link to the Decision Outcome so the applicant can receive this critical email communication and follow the instructions to upload documents.
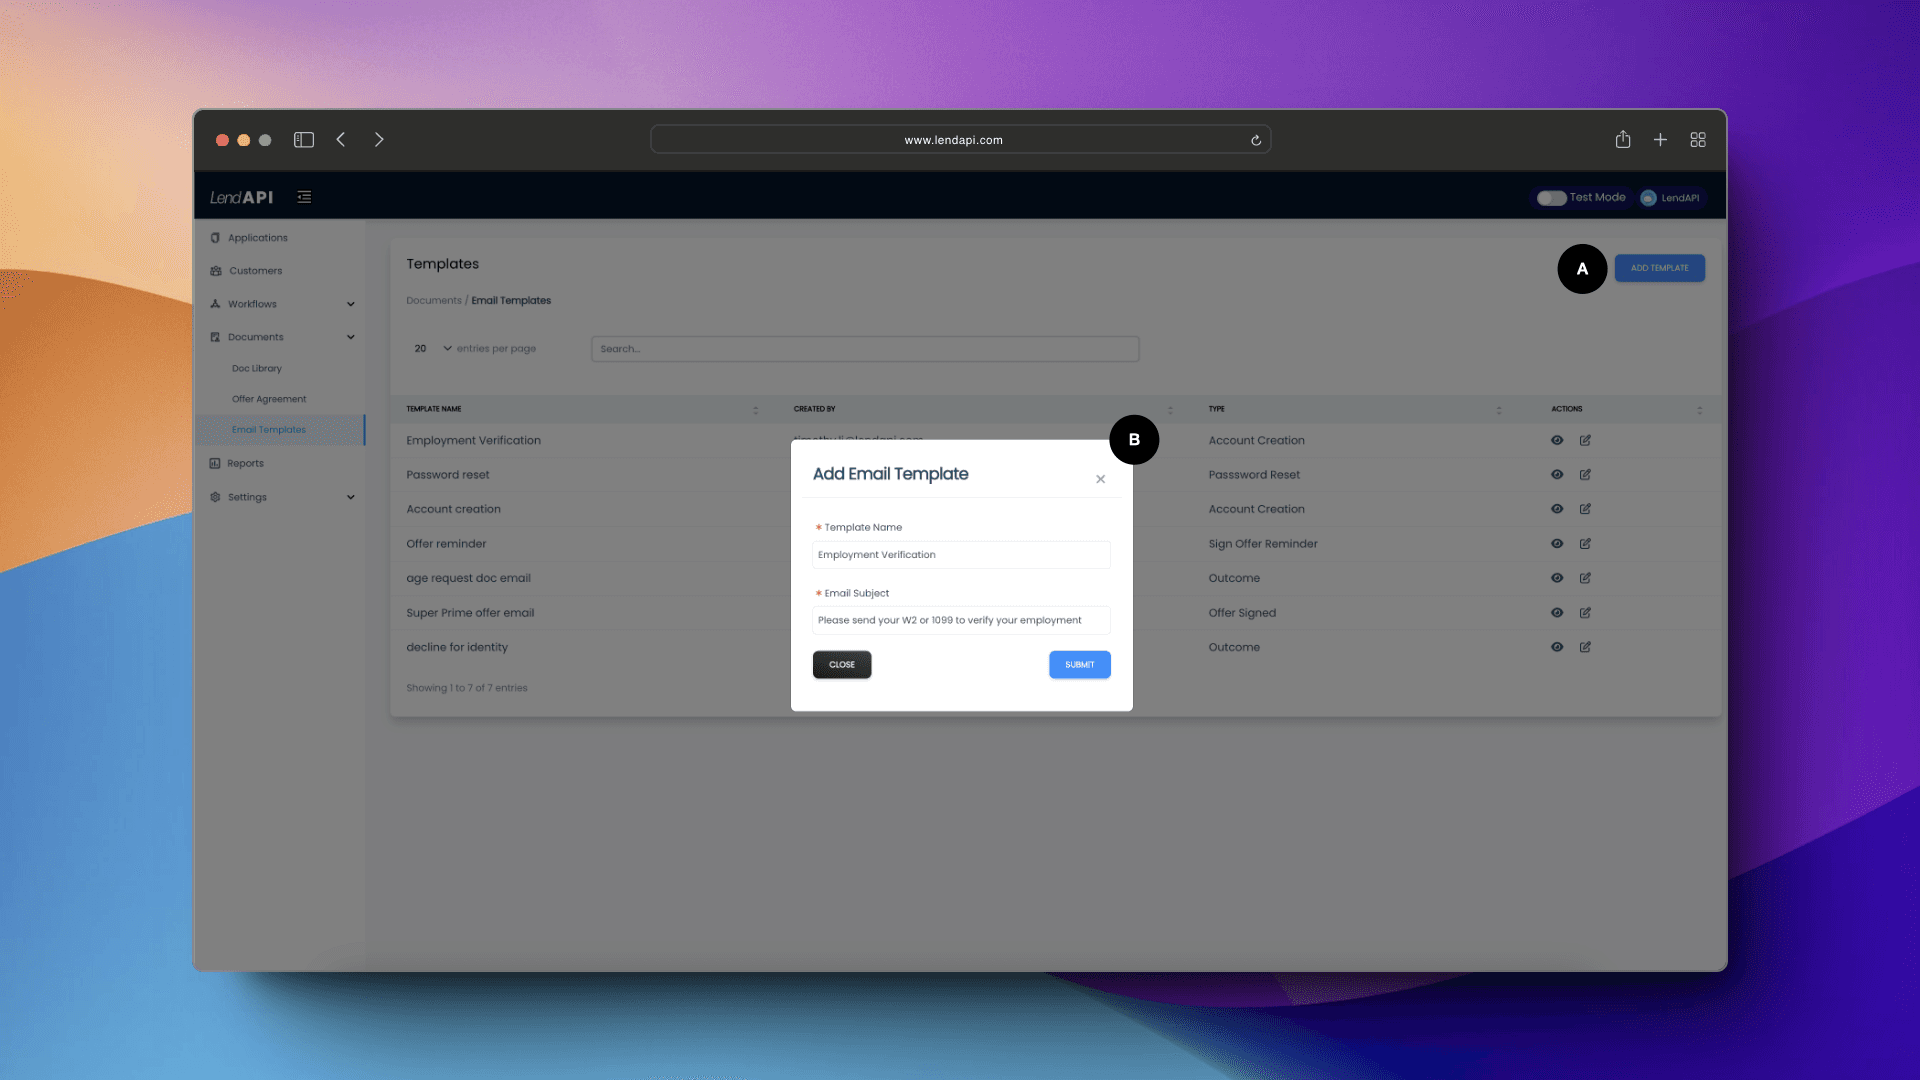
A. “Add Template” button within the Email Template section of the tool will engage a prompt for us to name a new email template.
B. This is where you can give your new email template a name and a subject line.
Editing the email template which we will link to Doc Request Decision Outcome
Once we give a name and a subject line to a new email template, the tool will open up an email template editor. In this editor, you can write your instructions, contact information and why this is necessary to your applicants that will receive this. And most importantly, you can link the Doc Upload Template to this email so the email and the system has awareness of which Doc Upload Template this applicant needs to follow.
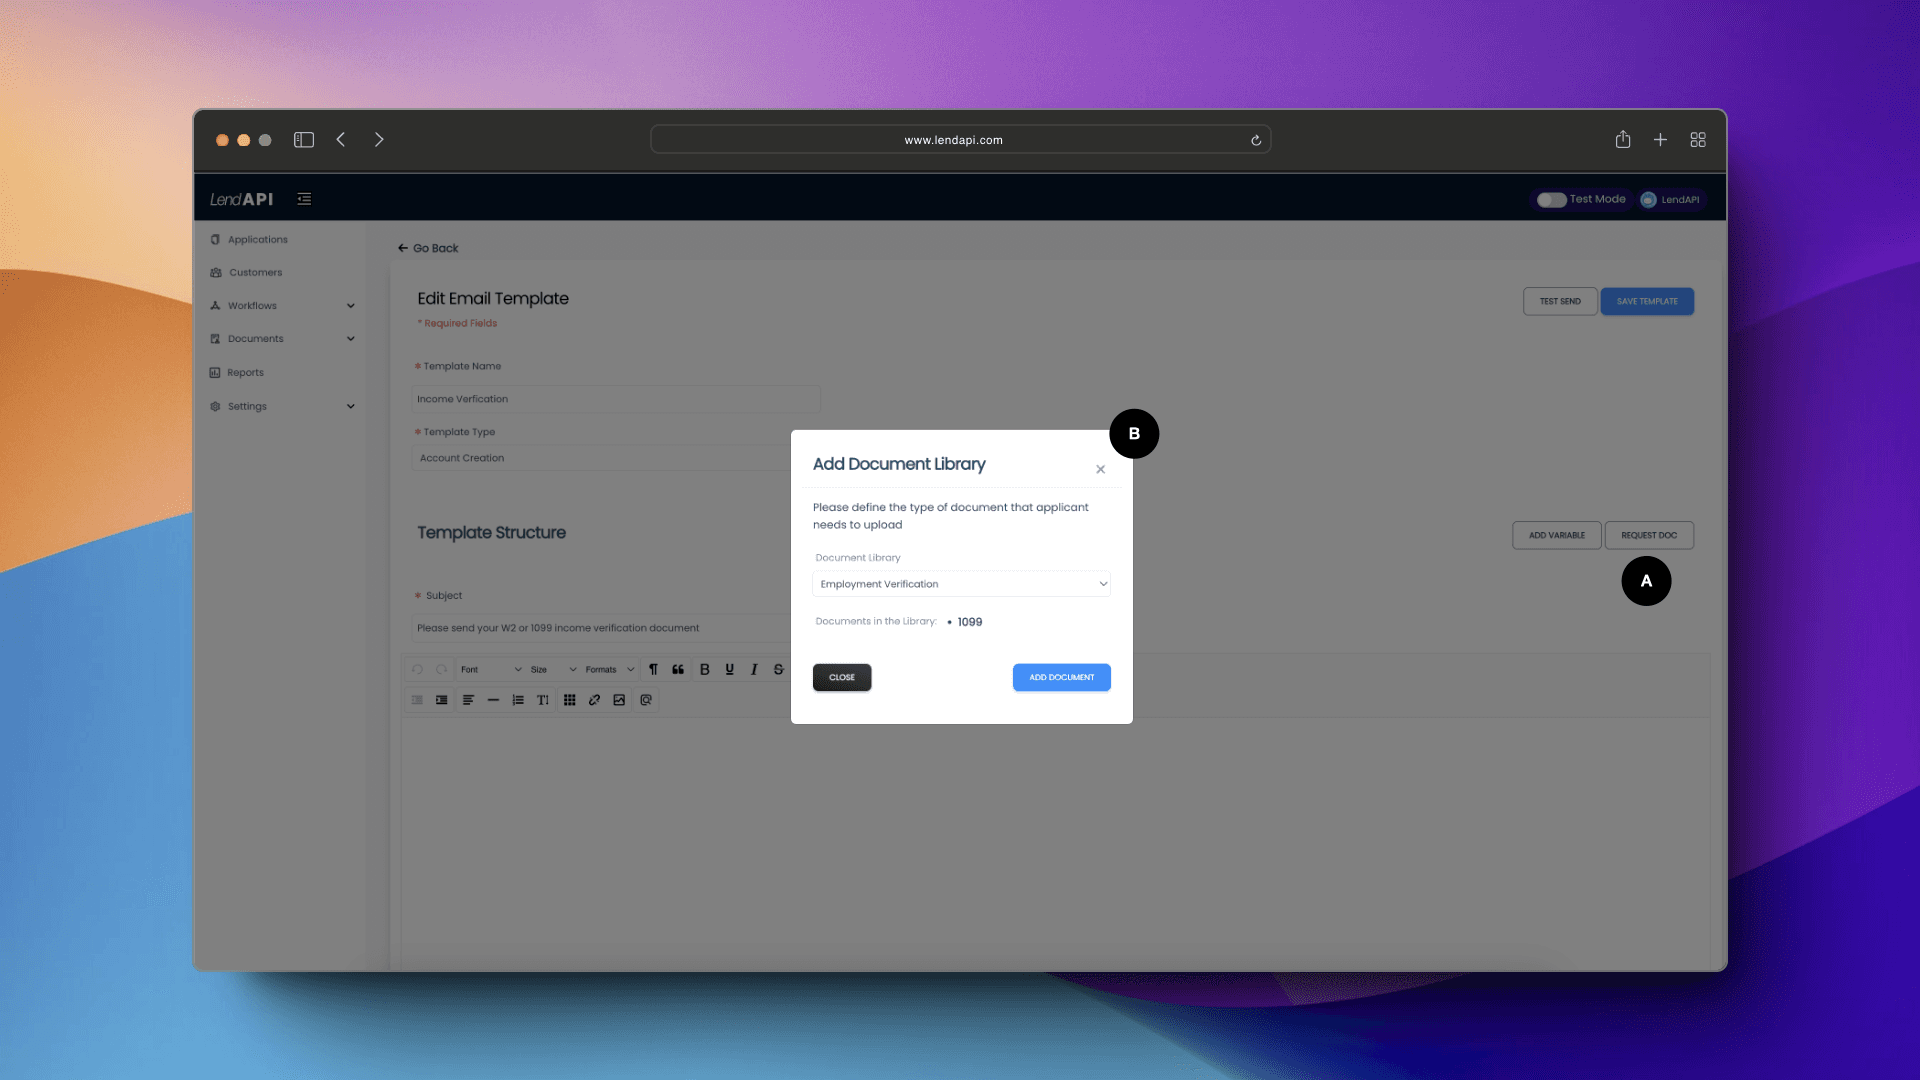
A. Within the email template editor, you can click on the “Request Doc” icon. This will bring up the prompt to list all of the Doc Upload Templates in the library.
B. You can then select the appropriate Doc Upload Template from the drop down. Since this example is all about Employment Verification, we will select the Employment Verification doc upload template from the drop down. Once confirmed, the email template you are editing will have a link embedded for the applicant to upload the 1099 and W2 document items which we programmed earlier.
Testing the email template
We have another section on email templates but here we will show you how easy it is to test send an email you just created.
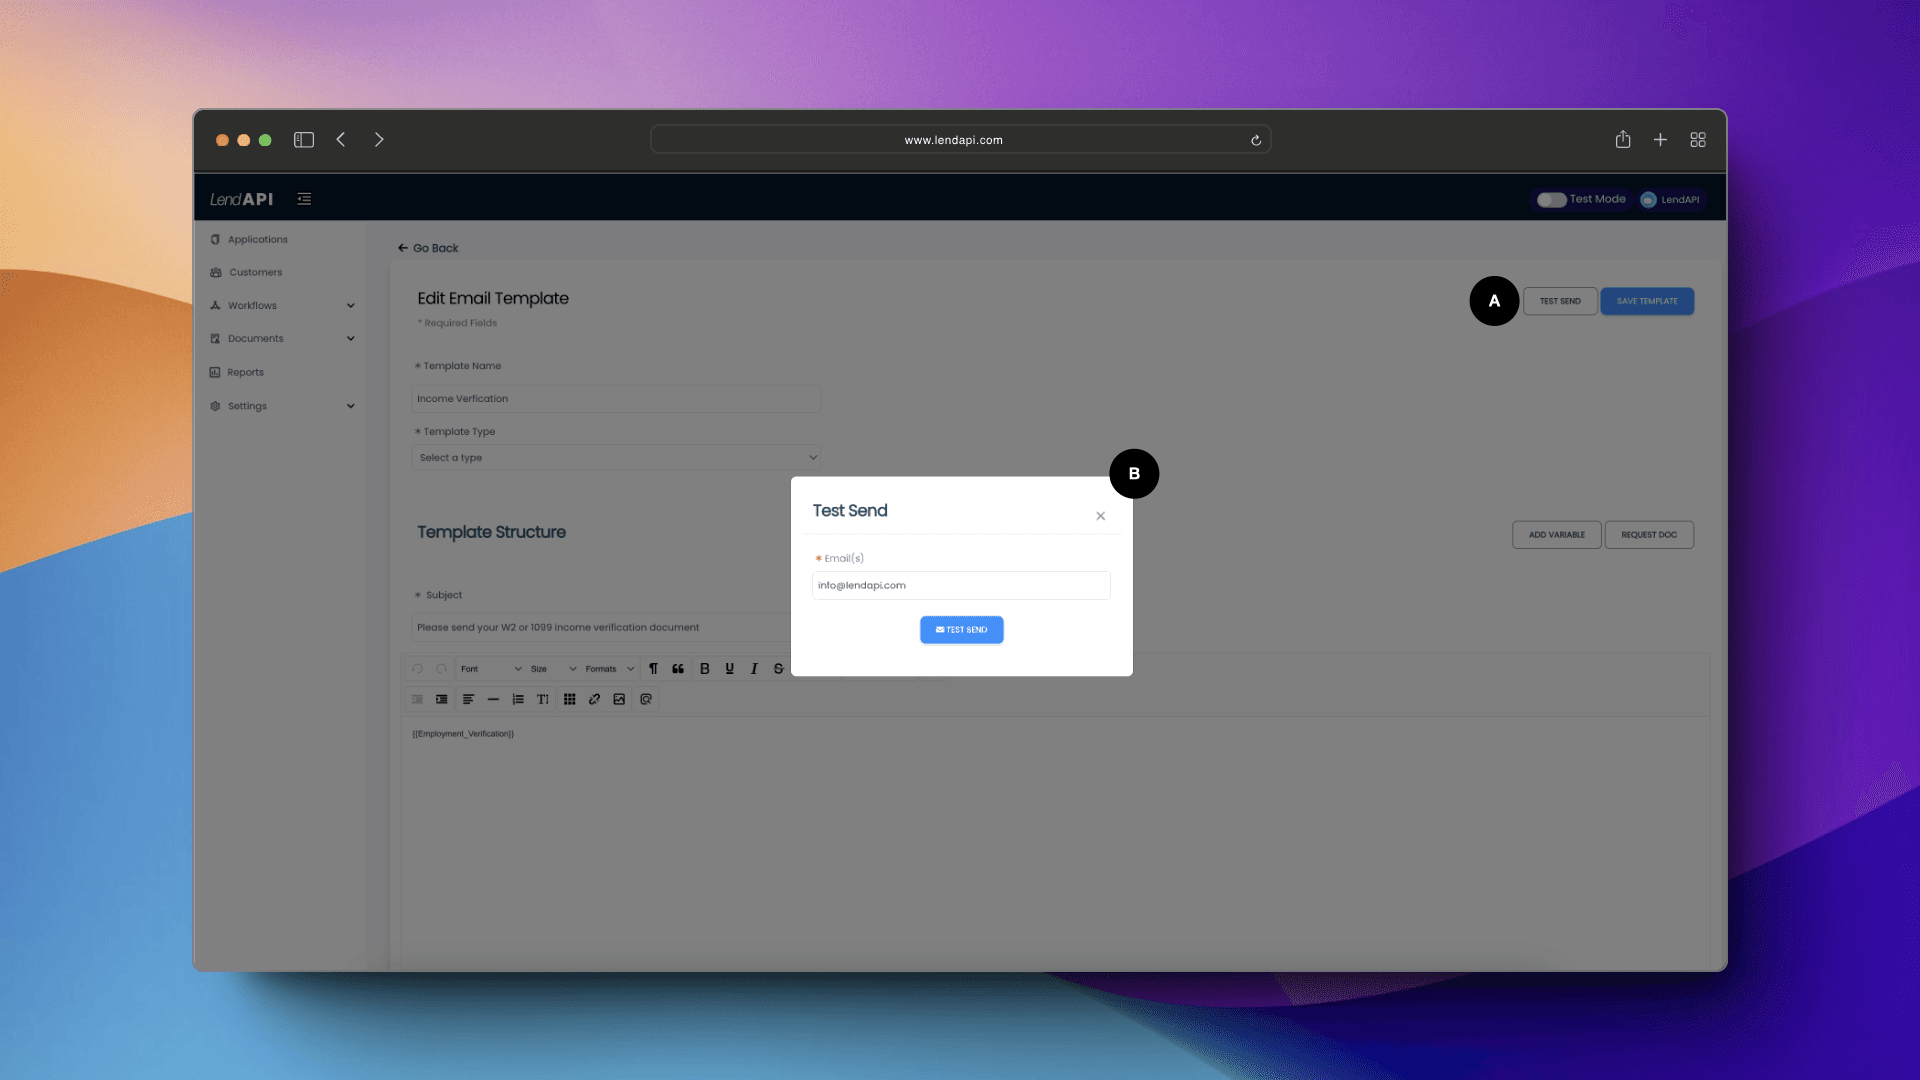
A. Click on the “Test Send” button and a prompt will appear.
B. You can enter an email address where you want the test emails to go.
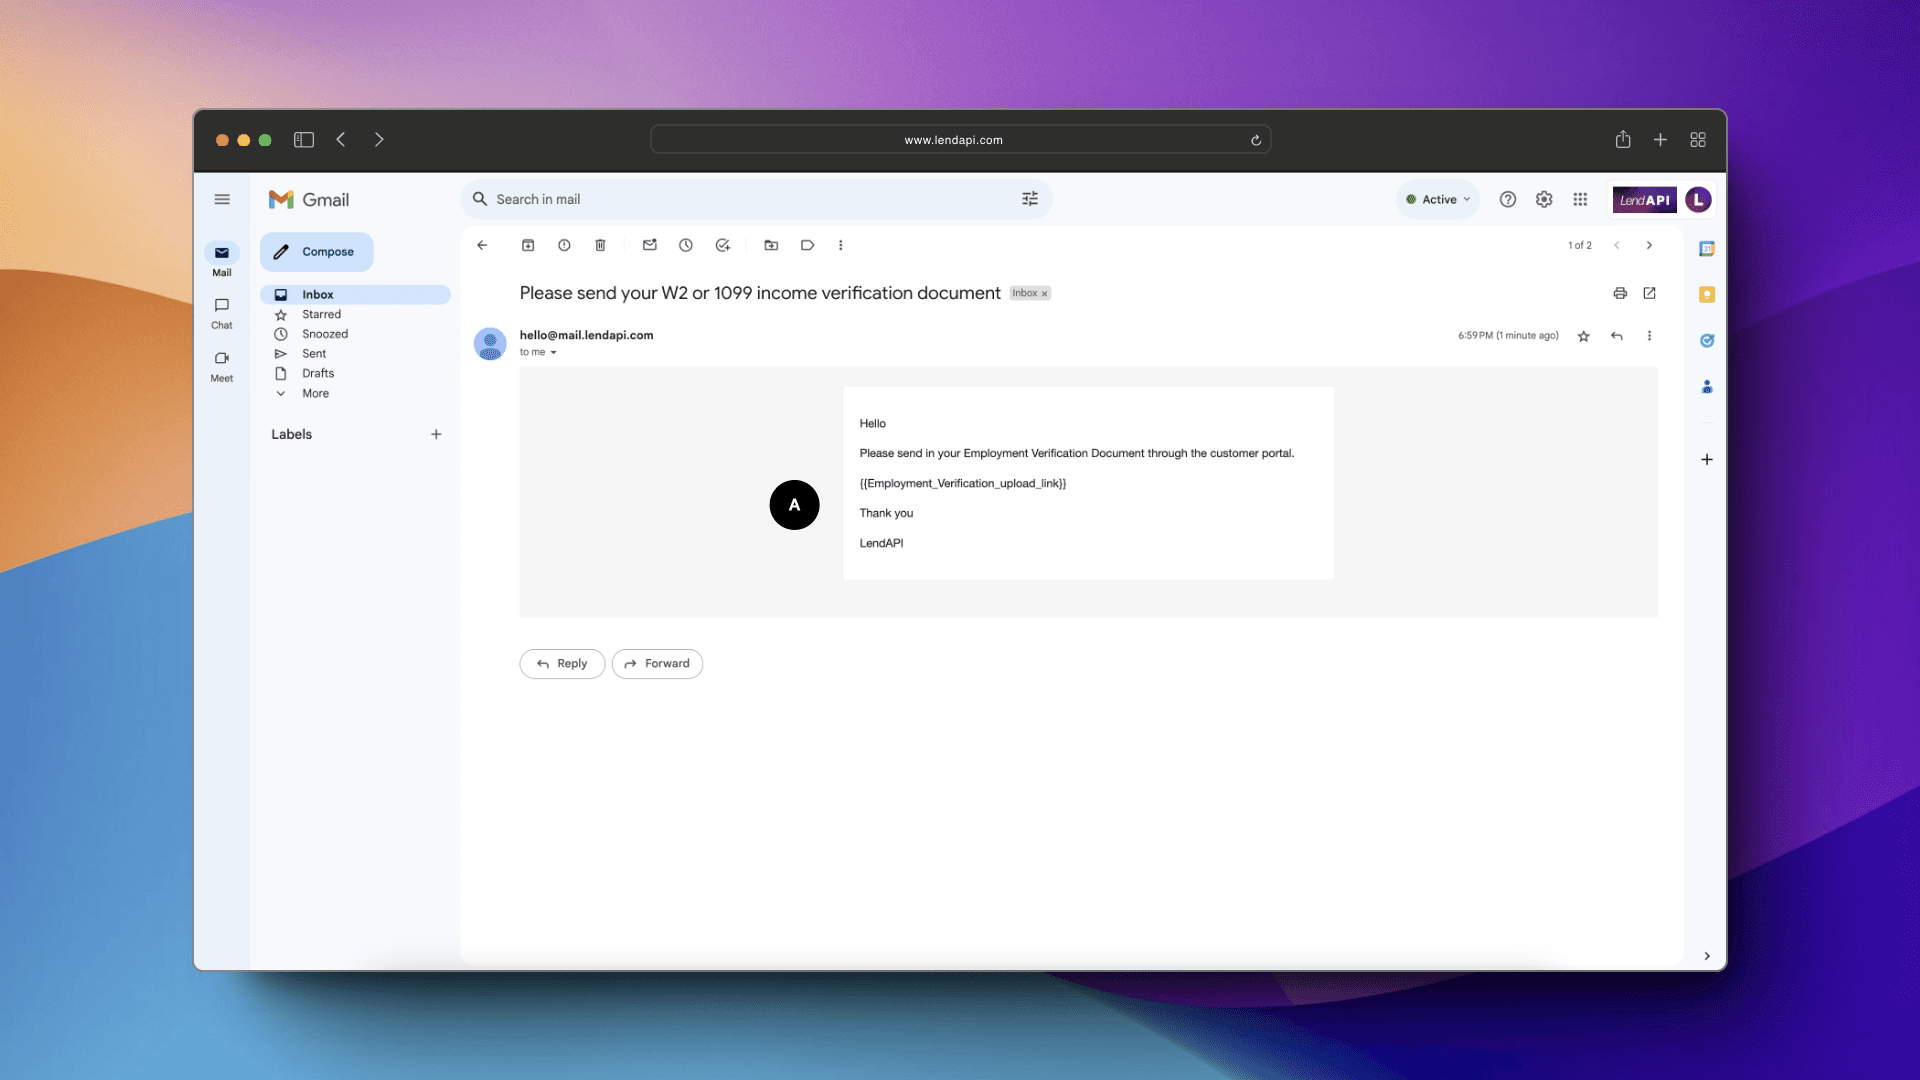
A. This is the test email you will receive. The link will become a live link in live mode.
Linking to Decision Engine and Decision Tree
Finally, after building the Doc Upload Template, Document Items, Decision Outcomes and Email Template. We are finally ready to link the Doc Upload Template as an action/outcome to the End Node of your decision tree.
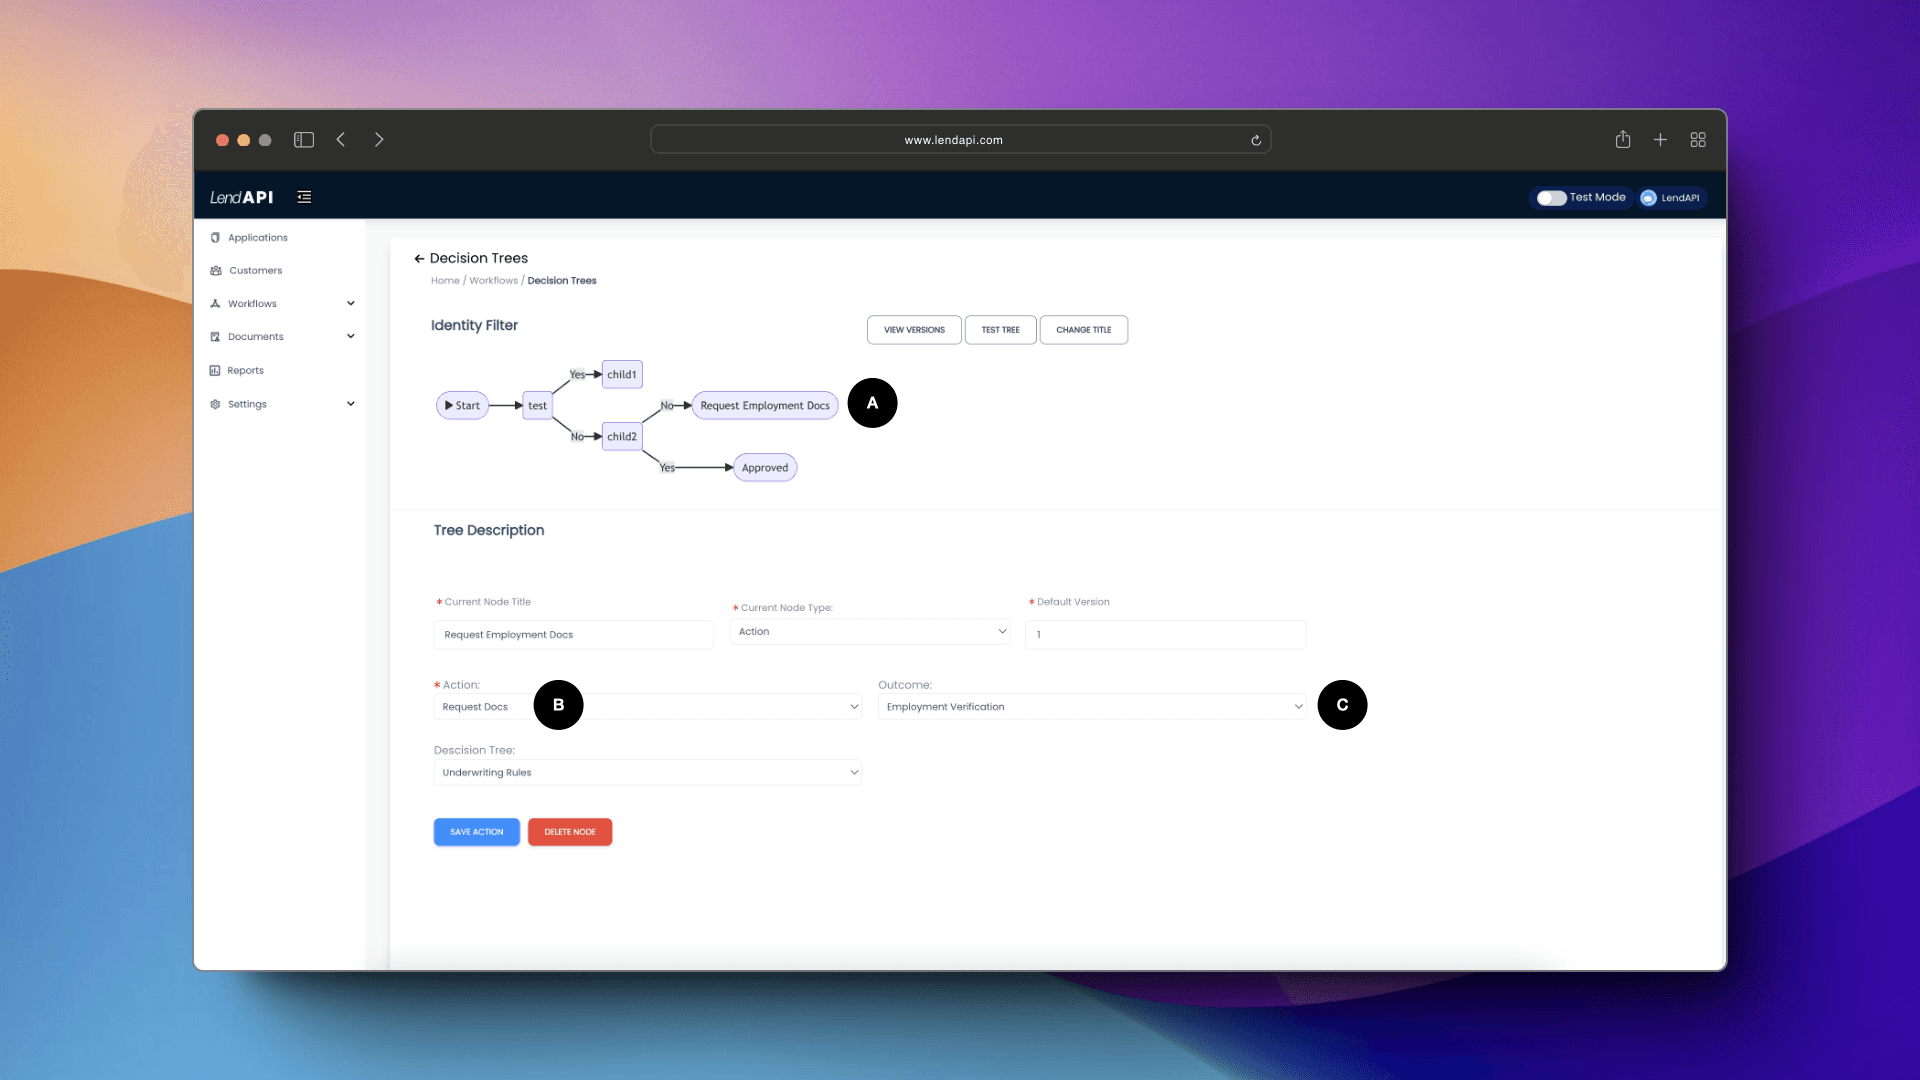
A. To link the End Node of a decision tree to the Doc Upload Template we created to ask for additional information, we need to create a child node on the “No” decision path. In essence, if the previous decision, most likely an verification score fails, then the decision path will lead to “Request Employment docs”. And the “Yes” decision path will lead to an approval Decision Action.
B. For the No path and for the Request Employment Doc end node, we will select Request Docs as the Decision Action.
C. And for Decision Outcome, we will select Employment Verification which is tied to the Employment Verification Email which triggers the employment Doc Upload Template we created earlier in this exercise.
An important piece of information to note. For Request Document Decision Outcomes, we must also connect another decision tree for that End Node. It is because after the document items are reviewed and validated back to the back office staff, the decision tree takes over and further processes that application with additional rules.


